redis-cli
To use redis-cli, next command must be used:
> vs-redis-cli
Information about the version of Redis, connected clients/applications, and other details can be seen using next redis-cli command:
> info
A full list of redis-cli commands and information about their usage can be found in the Redis documentation:
redis.io/commands/
Using Redis Object Cache For WordPress
For the WordPress plugin Redis Object Cache, the minimum required PHP version is 7.2. Additionally for the corresponding main or subdomain where WordPress is installed, the Redis extension under PHP extensions must be enabled, which is on by default.
Starting the Redis Server
To start the Redis server, go to the Webhosting page in My Zone management, select from the menu: Databases > Redis and click on the Enable Redis instance button:
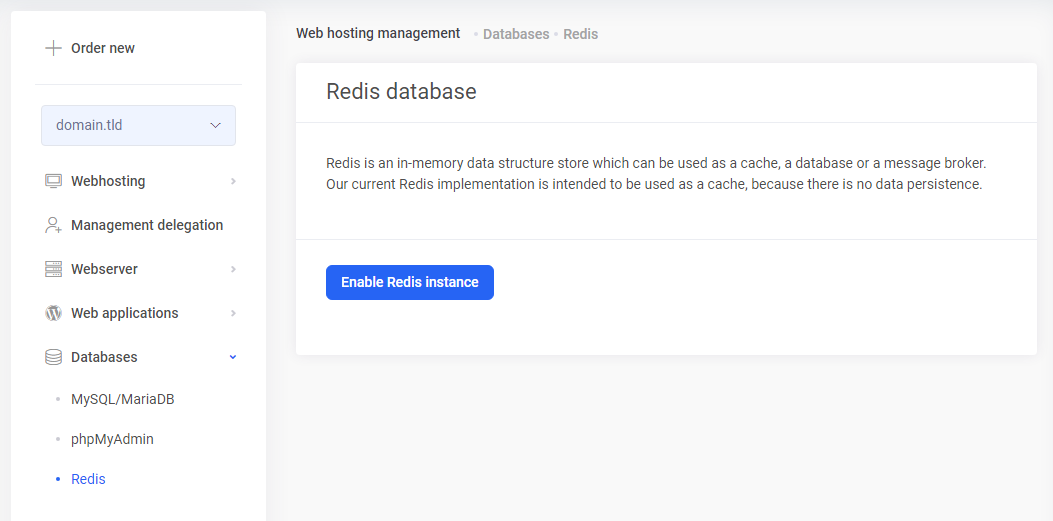
Keep this page open until the necessary information for the WordPress’ wp-config.php file has been copied from here.
Configuration and Activation
Log into the WordPress dashboard and install and activate the new plugin called Redis Object Cache.
Next, open the WordPress configuration file wp-config.php.
Add the necessary Redis configuration data to the wp-config.php file before the “stop editing” line located at the end of the file.
define( 'WP_REDIS_HOST', '127.1.23.456' );
define( 'WP_REDIS_PORT', 6379 );
define( 'WP_REDIS_PASSWORD', 'abcdefghijklm1234567890' );
define( 'WP_REDIS_CLIENT', 'phpredis' );
define( 'WP_REDIS_PREFIX', 'my-site' );
define( 'WP_REDIS_DATABASE', 0 );
define( 'WP_REDIS_TIMEOUT', 1 );
define( 'WP_REDIS_READ_TIMEOUT', 1 );
define( 'WP_REDIS_MAXTTL', 86400 );
Values for WP_REDIS_HOST ja WP_REDIS_PASSWORD can be found on Webhosting page in My Zone management, under Databases > Redis.
Remaining configuration details and detailed instructions can be found in the plugin documentation:
Redis Object Cache for WordPress – Configuration
Installing Redis Object Cache – Configuring the plugin
After adding the Redis configuration into the wp-config.php file, reload the Redis page in the WordPress dashboard: Settings > Redis. On the Overview tab, Redis should now be as “Reachable”:
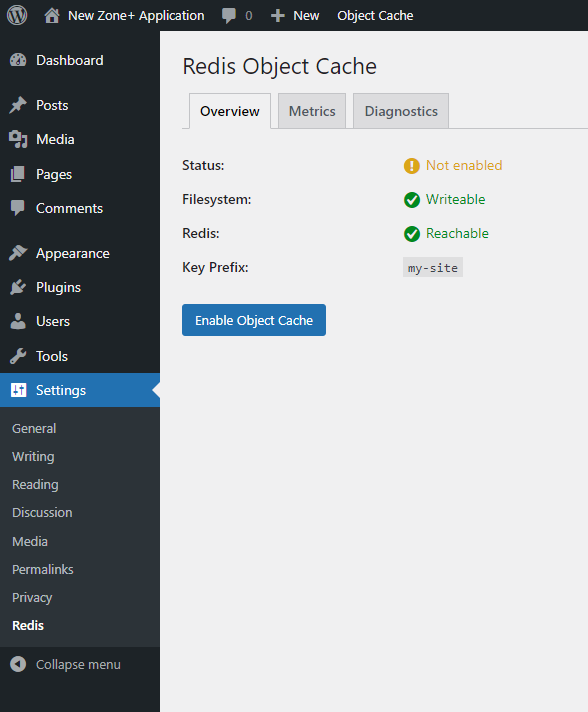 Then activate Redis by clicking the
 Enable Object Cache button on the same page.
Usage Graphs
The usage graphs of Redis, which provide an overview of memory usage, operations, connections, and key usage, can be viewed in My Zone management, on Webhosting page, under Databases > Redis.
Flushing Redis cache
In most cases there is no need to flush the Redis cache.
However, it can be done as a last resort if WordPress background operations or the dashboard are not functioning properly or if enabling and disabling plugins will fail.
To flush the Redis cache, go to the Settings > Redis in the WordPress dashboard and click the Flush Cache button.
The redis-cli command for this is:
> FLUSHALL
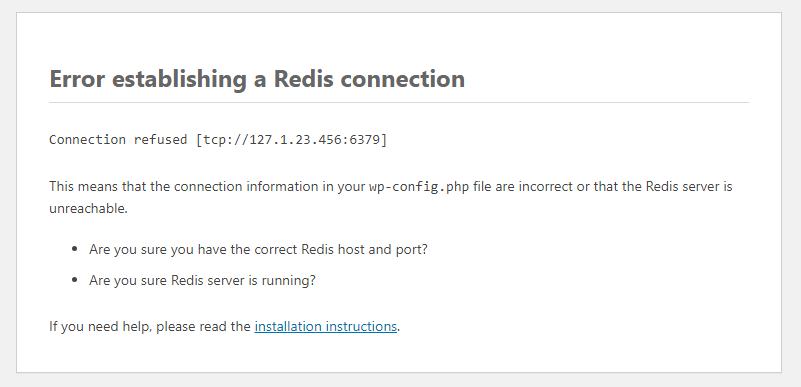
WordPress error “Error establishing a Redis connection”
If WordPress displays an error message “Error establishing a Redis connection”, it means either that the Redis server is not running or the WordPress configuration file wp-config.php is missing the Redis configuration or it is incorrect.
Starting Redis Server With Custom Configuration File
If configuration settings needs to be changed or logging enabled, make a copy of the existing configuration file, apply the necessary changes to it and start the Redis server as a PM2 application via the My Zone control panel.
New Configuration
Make a copy of the existing Redis configuration file, the location of which on the server is:
~/.zse/etc/redis-6379.cfg
Files can be copied and managed using the web-based file manager WebFTP, a separate FTP program or over an SSH connection.
Copying the Redis configuration file via SSH:
> /bin/cp -a ~/.zse/etc/redis-6379.cfg ~/my_redis.cfg
In the new configuration file, make at least the following changes (change the path to a log file to the correct one):
daemonize no

logfile "/data01/virt1234/redis.log"
If the loglevel setting is changed to debug, keep an eye on the size of the log file so that it doesn’t grow too big or add a cron job to rotate the log file.
PM2 Application For Redis
For the PM2 application, a configuration file needs to be added to the server for this purpose.
A sample PM2 application script with the filename redis.config.js (change the file path inside it):
module.exports = {
    apps: [
        {
            name: "redis",
            script: "/usr/sbin/redis-server",
            args: "/data01/virt1234/my_redis.cfg",
            autorestart: true,
            watch: false
        }
    ]
}
Copy the PM2 application file redis.config.js to the server.
Add a new PM2 application via the My Zone control panel by entering the file path to redis.config.js in the script location text box, and then start the new PM2 application.
Starting The Redis Server Manually
The Redis server can also be started manually.
In this case, the daemonize yes setting must be present in the configuration file so that the Redis server will run in the background.
Starting the Redis server via SSH terminal (change the path to a file to the correct one)::
/usr/sbin/redis-server /data01/virt1234/my_redis.cfg
To stop the Redis server, you can use the shutdown command in the Redis CLI or the following command in the terminal. In the command, replace the IP address and password with the ones specified in the Redis configuration file:
/usr/bin/redis-cli -h 127.1.23.456 -p 6379 -a redis_password shutdown